Showing posts with label DIY. Show all posts

Wednesday, May 7, 2014

Thursday, April 3, 2014

i'm an artist ... kinda

Shameless plug I know, but I'm really excited about this. Working at this company for over 3 1/2 years, I finally had the courage to create a project for work. It was more of a push from one of my peers. I'm finally published in Somerset Apprentice, a magazine for novice artists.


Wednesday, January 29, 2014

snip. ink. paste. repeat

I've been in kinda of a crafty mood lately.


I told myself this year to start being a bit more crafty. I began with card-marking because it seemed to be the easiest of the crafts. I'm still working on a few kinks here and there, but I really enjoyed making this one and a few other variations as well. 

And no, not preggo. 


Thursday, March 7, 2013

a bit of paper, yarn & paint

So as stated in my earlier post this year, I've dedicated to at least creating something once a week. If it wasn't for my work environment, being exposed to arts and crafts of all mediums, I'd be screwed.

How many times have I gone on Pinterest and pinned endless amounts of pins for my [board]...and have done nothing?

A coworker of mine gave me the extra push to set out and just create.

Here's a look of what I've been creating thus far:


I helped my sister-in-laws and mother-in-law throw a beautiful, retro-style baby shower for my sister-in-law, Tamara. The theme was Mustache Bash, a popular favorite on Pinterest. Though it was post acid trauma, I still managed the energy to help out with decorations. Creating the banners were especially my favorites!


For one of my upcoming issues, Haute Handbags, I asked some of the editors and photographers to with me in creating altered totes for an upcoming challenge. I was super super nervous and stressed, afraid of what the outcome would look like. Despite the disadvantage of time, I was able to create this guy. Hopefully sometime in the future, I'll add some other embellishments before I can comfortably walk around with it.

My friend Bri aka Big Bri had her birthday a couple of weeks ago. Also her and her friend Dannah started a new wedding consultation company called Cafe I Do. So to celebrate her 23rd year of birth and her new endeavor, I made these little guys. I bought most of this stuff from my company's Shoppe at Somerset

I've been getting into calligraphy and doodling lately. Maybe I'll put some more on here. Eek.


Thursday, June 28, 2012

paper flower

I'm obsessed with Pinterest. I can easily spend a few hours just perusing through the different categories and pinning them on my boards. Lately, I've been pinning a lot of arts and crafts projects. This is probably one of my favorite ones.
ohcrafts.net/wedding-paper-flower-tutorial.php

It's so simple and it takes me about a couple minutes to do. It's easy if  you have some random scraps of patterned paper lying around (I have a collection in my drawer...eee). I'm thinking about adding these little things to my desk tomorrow. 

Friday, May 18, 2012

blue bookshelf

It was almost four years ago. Brian invited me over to help paint his desk that he assembled. After opening the lid of the can of paint, he realized the black paint he had requested turned out to be dark blue. Pure disappointment. I assured him that it was a good color (but knew black would've been the better color). It took a few strokes on the desk to convince both of us that the accident made by the guy at Home Depot turned out to be...well, not an accident. In the words of a Chinese turtle, "There are no accidents." The color turned out better than we thought and even added some color to his room. 


So I've been using this color ever since. In all mediums in fact. Aside from the usual/random crafting I do, it has influenced my life. It ended up being one of my color's at my wedding. Without realizing it, I find myself buying striped shirts and tank tops with that exact color of blue. Even bought a blue car :) 


We decided to paint our wooden bookshelf this color. We have another one that is painted as well; the splatter paint on the backing was by accident (aka me), but it provided a really good background. With the paintbrushes in our hand filled with blue thickness, we painted. 


Success.


Thursday, April 19, 2012

embellished wine bottle


I have a collection of empty wine bottles in my home. They sit on our very lengthy windowsill. I've been hoarding them since I've been married hoping that one day I will use them to decorate our place. Sadly, spiders have found more use of them then I have.

A couple of months ago, I wrote an article for artist Leslie Shewring for the Spring 2012 issue of Somerset Life titled Transformed Bottle Décor. She transformed empty bottles into unique collaged vases for her fresh flowers. I loved how she embellished the bottles with Washi tape and other bits as well (acreativemint.typepad.com/a_creative_mint/2011/06/summer-raspberry-peach-and-mint.html ). 

One night, I decided I wanted to paint one of my empty wine bottles. After soaking it in hot water and soap, I peeled off the label and started to work. But after painting a couple layers of white acrylic paint and coating it with Mod Podge, I was stuck. I didn't want to copy exactly what Leslie did; I wanted to add my personality to it. And with moving and all, I didn't want to create a bigger mess by opening my arts and crafts bins.

I eventually brought it to work because there was no place to put it at home. For a couple of days, it sat on my desk. At first, I was just going to leave it as it was: a painted wine bottle. But then I realized it was an excuse for my laziness. I looked through my desk drawers to see if I could find anything. I ran into a roll of mustard-yellow Washi tape, twine, corrugated cardboard, old book text, patterned paper, and millinery flowers. Perfect.


I was happy with the results. And I feel a little bit more confident in my arts and crafts skills. Practice makes perfect, right?

Thank you Leslie Shewring for your creativity. To view more of her art, visit her blog at http://www.acreativemint.typepad.com/.


Friday, April 6, 2012

never too old for cookies & milk

This past Sunday, we celebrated my brother-in-law's 40th birthday. The theme was a rustic, classy southern feel. My sister-in-law, Christin, wanted to throw him a memorable party to celebrate this milestone with family and close friends. The party was filled with childhood photos, roast n' toasts, and children running all around in the backyard. 

When it came to planning this party, details meant everything to Christin. From centerpieces to table set up to even party favors, she wanted everything to be perfect. And perfect it was. She surpassed everyone's expectations, even her own at times as she was setting up the party.

    
   Top&Bottom: Banners made from burlap.
Collage: Pictures from childhood to present.
Centerpieces

Kid's Table
Refreshments
Sweet Potato Fries, BBQ Pulled Pork, Mac N' Cheese, Salad
I like LOVE food.
Dessert Table: German Chocolate Cake, Red Velvet Cupcakes, Crunchy Chocolate Chip Cookies
My favorite part of the evening was the roast n' toasts. It was a chance for everyone to share a story (most of which were embarrassing, of course) about Todd. Since his family couldn't fly out from Tennessee to celebrate his birthday, Christin emailed them ahead of time to share some stories about him. People around the table read the emails that his family wrote (Guess he's a fan of the song Crazy Train, who knew?) Afterwards, it was open to everyone to chime in. Although there were many laughs (and a few tears as well), it was obvious that Todd is loved by his wife, family, and friends.

Turning 40 may seem scary. A lot of times, we're not prepared for that milestone. But when you're surrounded by family and friends who you love and love you even more, you realize that being 40 doesn't define you. It's just another number. What defines you is the imprint you leave on the people in your life.
Christen+Todd
Happy Birthday Todd!

Friday, March 30, 2012

the makings of a flower headband

I love arts and crafts.

I’m lucky and blessed to work in a company that showcases talented artists in the crafting community (http://www.stampington.com/). From cards to handbags to even themed parties, I’m constantly in awe of how the artists create these ideas. As I peruse through each magazine I always tell myself, “I want to make that when I go home.” It’s been a year and a half since I started working there. And I have yet to create something artsy other than crocheting, my go-to craft. In my art bins, I have paint, yarn, tulle, Mod Podge, canvas boards, Walnut Ink, adhesives—just sitting there.

But today’s conversation would change all that. I was talking with one of the other editor’s this morning. We were talking about how creative and innovative artists can be in this industry. I knew she had created previous works, so we talked about her artful journey. But then she asked me if I had created anything since being here. Shaking my head, she asked me, “Why?” As much as I tried to answer the question with “Well I’m not that talented,” “I can’t compete with these artists,” and even “I’m afraid to mess up,” I knew that deep down I had no real answer. She gave me the best advice anyone can give: Just do it. I know it’s a bit chessy, but it’s the truth. Why not just do it instead of making up reasons not to? It was the push I needed to start crafting.

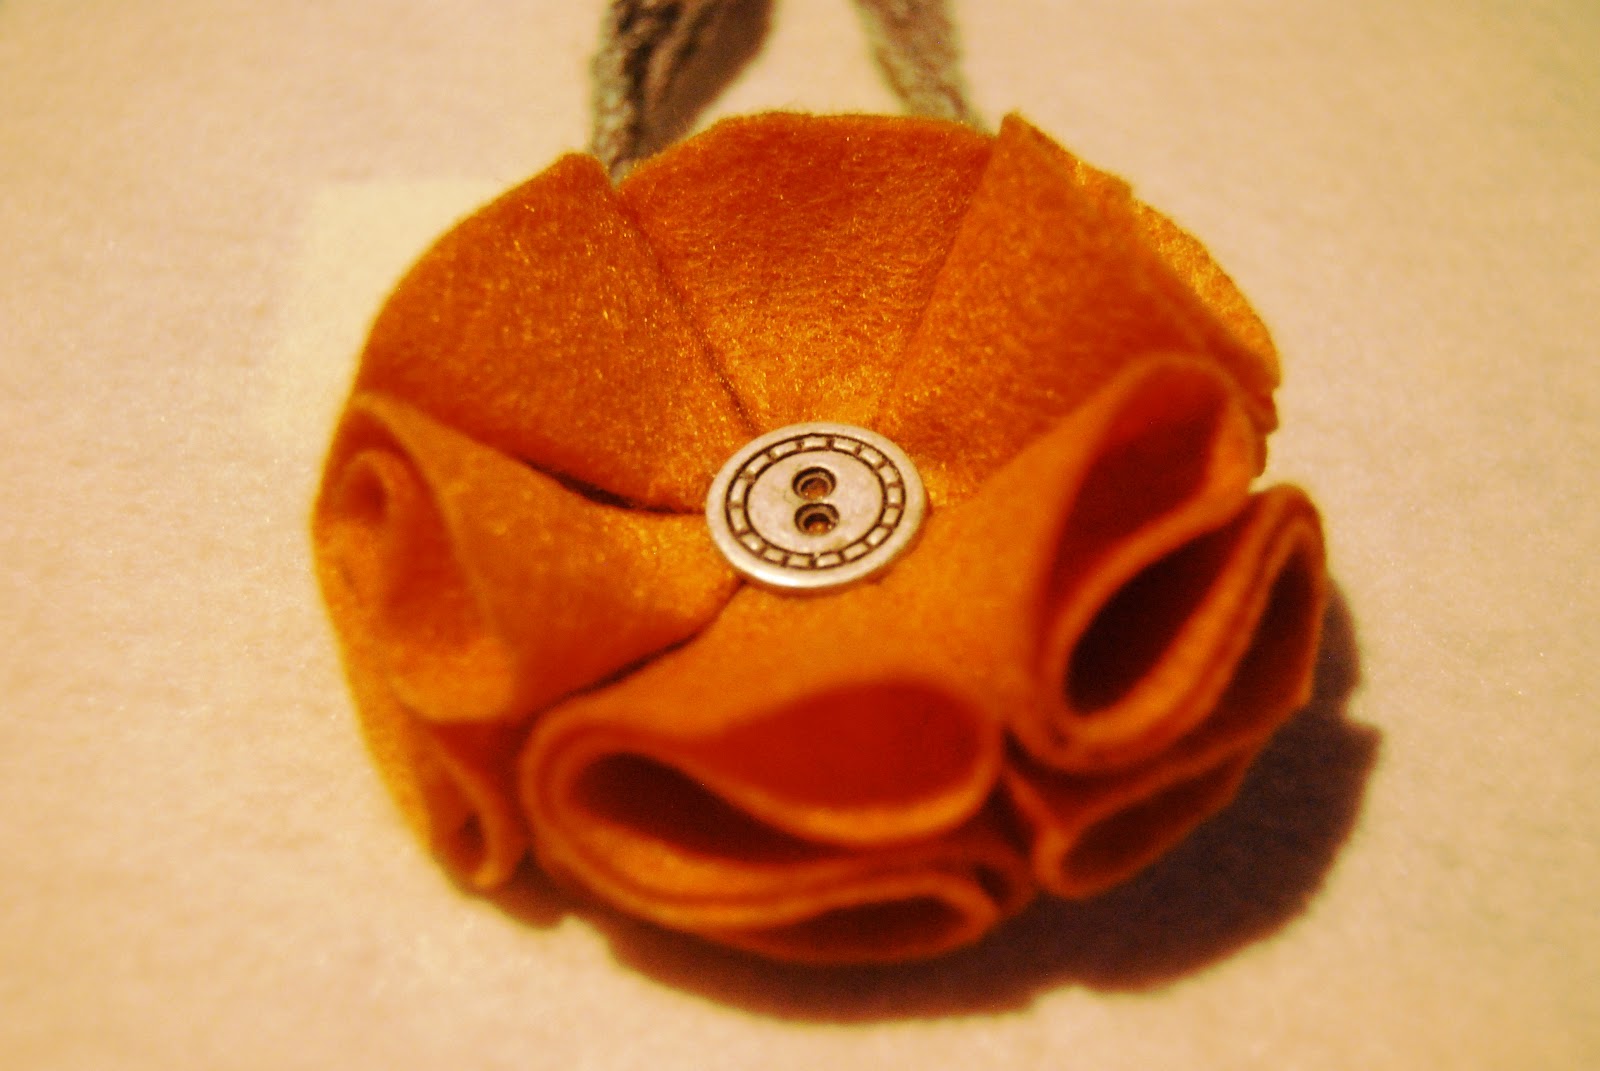
Of course, I went on Pinterest to find some inspiration. I clicked on my “Crafties” board to see what project I would focus on tonight. At first, I wanted to paint something onto my canvas boards that I just bought. I looked through all the canvases and collages I had pinned, and nothing really stood out. Disappointed, I looked at other crafts hoping that something else would pop out. My eyes drew on a picture of hair pins made out of felt material. When I clicked on the image, it opened into a blog dated a couple of years ago. There, I found a step-by-step of how to create this adorable flower head pin. I love hair accessories, so it was an obvious choice to pick this project.

When looked at my finished piece, I was quite happy with the results, and I couldn’t wait to show it to someone (95% of the time it’s my husband). Even though it was simple and had been done before, I did it. I created something. And I even added my own personality to it by creating it into a headband instead of a hair pin.


Special thanks to the artist for posting this blog. To learn more projects from her, visit http://www.befickle.blogspot.com/.
And a special thanks to Jenn inspiring me to start on my artful journey.